Panel guide
Use the Phoenix MCP sidebar panel to manage tokens, approvals, changes, MESA profiles, audit logs, and settings. This guide shows the main task in each tab.
Tokens
The Tokens tab lists every active token with its status and last use. From here you create tokens, open one to edit it, or launch the guided setup that walks a first-timer all the way to a tested connection (see Quick start).
Opening a token shows its detail page: the capability matrix, the permission tree, and lifecycle actions (rotate the raw value, revoke the token). The capability matrix is where you pick a persona or set individual capabilities to deny, allow, or confirm.
Switch complete token settings with presets
Settings presets (optional)
With the Token settings presets toggle enabled in Settings, each token gains a Presets card: named snapshots of its complete configuration (capabilities, permissions, rate limits, pass-through) you can switch between, for example a locked-down daily preset and a broader maintenance one on the same token. Enabling the toggle saves every token's current settings as its first preset ("Default preset", renameable inline).
The token is always "in" one preset, and edits you make are that preset's unsaved changes: switching to another preset first saves them into the outgoing preset (the dialog lists exactly what), then applies the target, so nothing is lost and there are no save prompts. Applying the preset you are already in does the opposite: it reverts the token to the preset's saved state, discarding the listed unsaved changes. The active preset cannot be deleted, and applying a preset that would enable pass-through asks for the same confirmation as enabling it by hand. Switching is admin-only; a connected agent cannot change its own preset, and after a switch the agent is nudged in-band to refresh its tool list (see the audit log's preset column for per-request attribution).
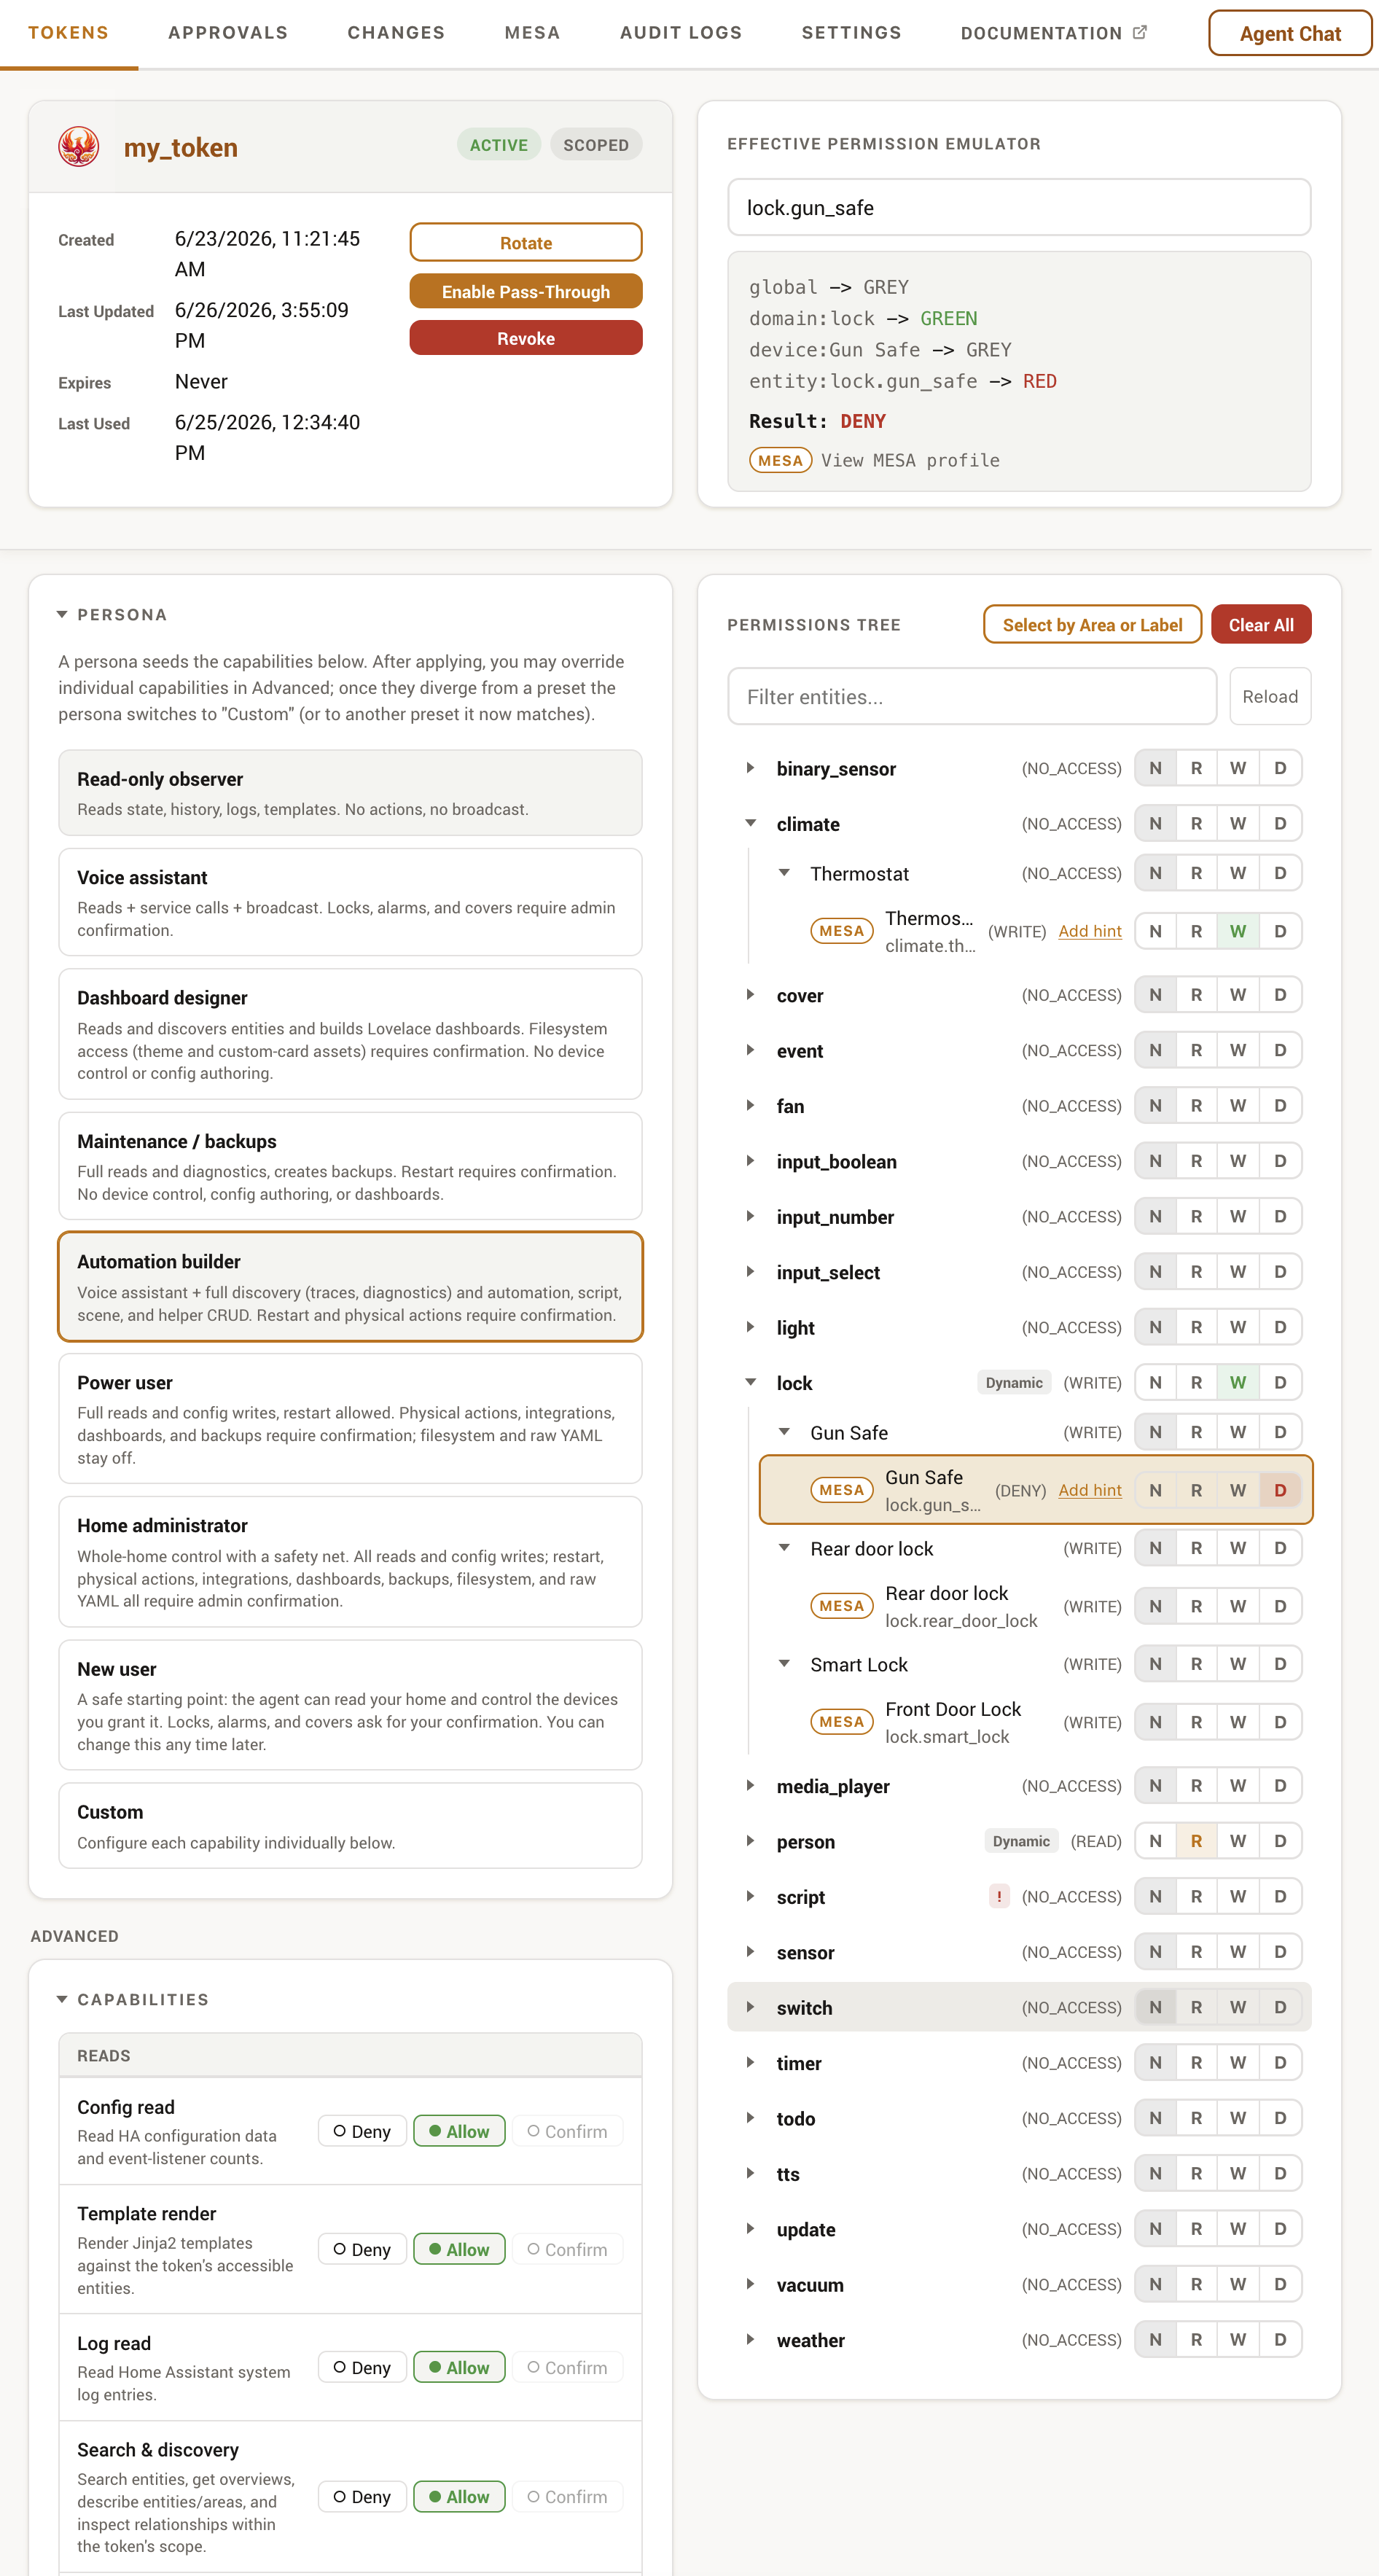
Painting the permission tree
The tree groups entities by domain and device. You rarely set every node: the usual pattern is to set a whole domain or device, leave the children grey so they inherit, then use RED to carve out exceptions. See Permissions for how the states resolve. Three panel tools make this faster.
Each row also carries a small MESA control, a + to create a profile or MESA when one already exists, which opens the profile editor over the tab without losing your place. It writes at the level of the row you clicked: a domain group authors a domain profile, a device group authors a device profile covering every entity that device owns, and an entity row authors an entity profile. Permissions and MESA are independent, so a profile written here changes what any token may do with that entity by nature, not just this one. The MESA page covers what the levels mean.
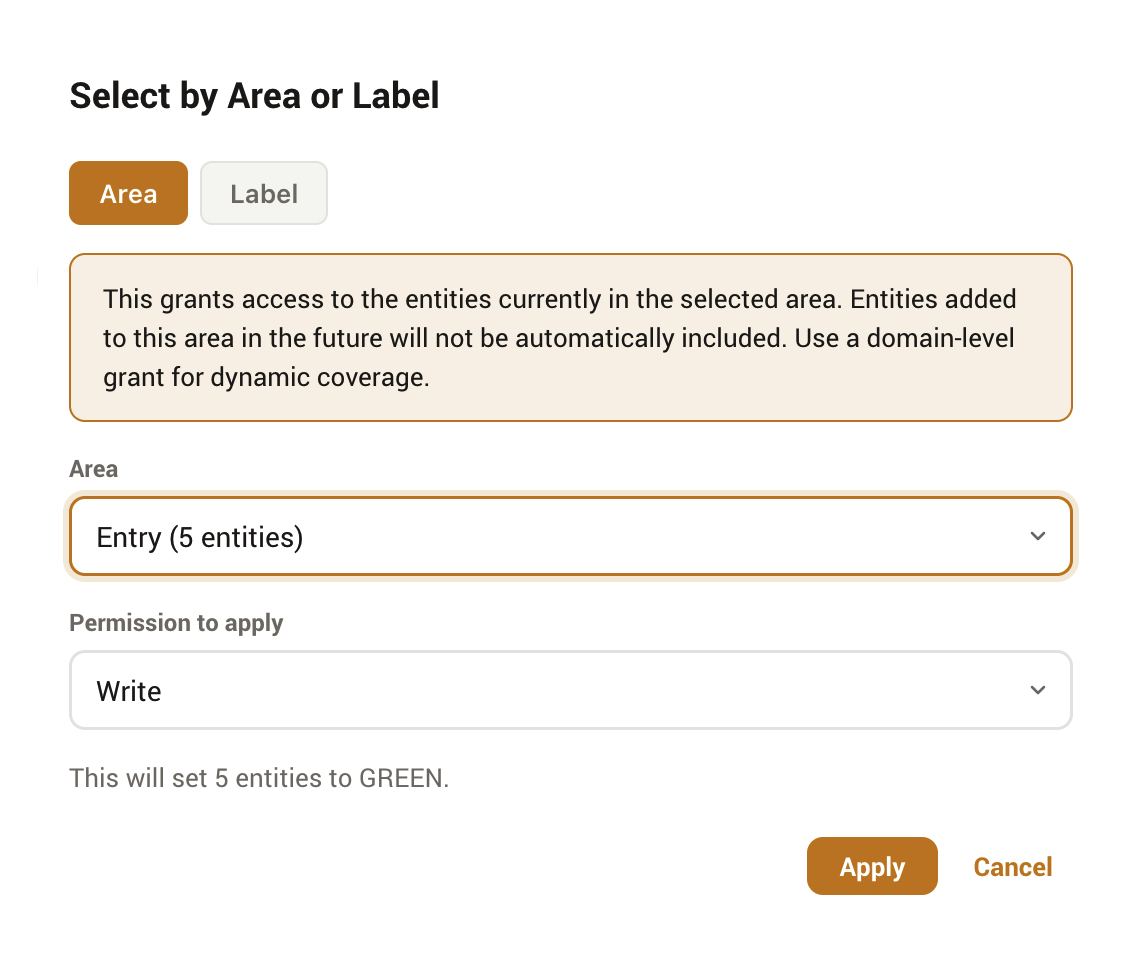
Select by area, label, or integration
The Select by area, label, or integration button applies one state to a server-resolved group. Pick a tab, choose the group or exact config entry, then choose Read, Write, Deny, or Remove grant. The integration tab shows title - domain and the full config-entry ID, then selects every currently owned device node and every live, enabled deviceless entity node. Existing child-entity restrictions stay unchanged.
It is a snapshot, not a new permission level
Area, label, and integration selection all resolve current registry membership and save the affected nodes in one atomic update. Future members are not picked up automatically. Registry-only deviceless entities still need a domain grant, and the dialog reports those domains. A shared-device warning means its device grant also affects entities owned by other config entries.
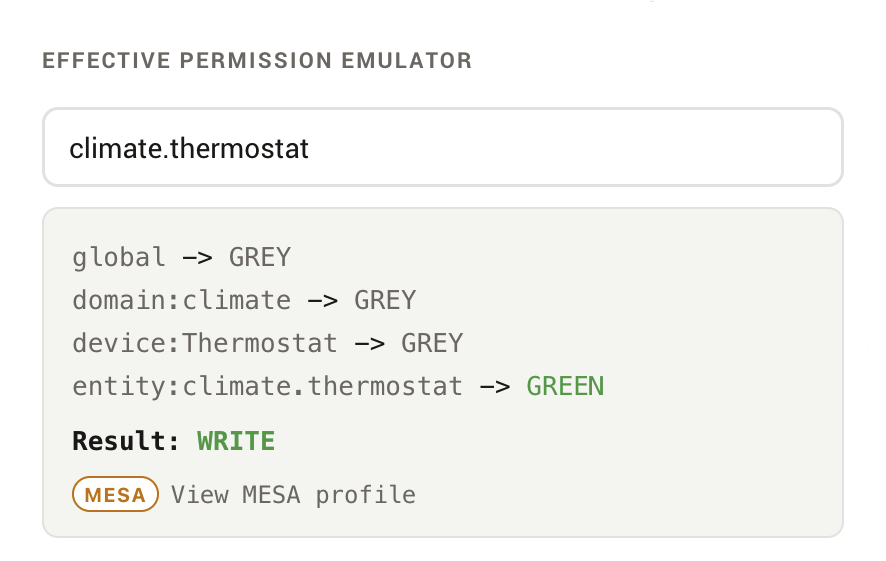
The effective-permission emulator
The emulator shows what Phoenix MCP will actually decide for any entity. Type an entity ID, or click one in the tree or summary, and Phoenix MCP runs the full two-pass resolver, then shows the result, which ancestor decided it, and the hint text if one is set. If a result surprises you, the path output names the ancestor that is overriding it.
The permission summary
A compact, sortable table of every node set to something other than GREY. It lists the node type, friendly name, ID, and current state. Clicking a row loads that entity into the emulator. An empty summary means no grants exist and the token has no access to anything.
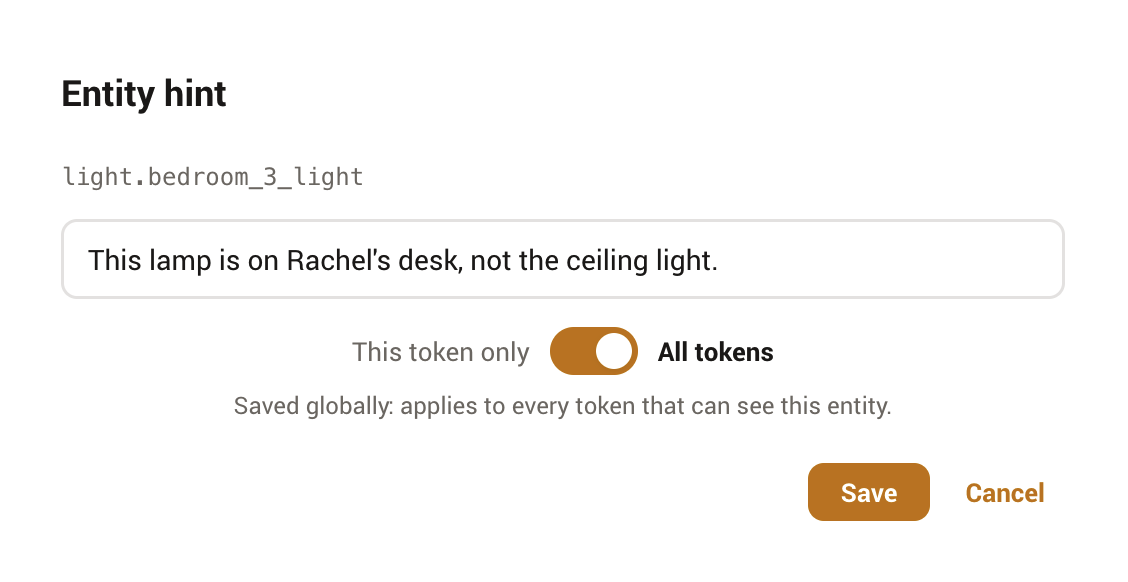
Entity hints
After granting access to an entity, you can attach an optional hint that is surfaced to the connected AI, to clarify what an entity represents, for example "This lamp is on Rachel's desk, not the ceiling light." Hints are capped at 200 characters and come in two scopes:
- This token only
- A per-token hint, stored on the permission node. It is visible only to this token and takes precedence over a global hint.
- All tokens
- A global hint for the entity, applied to every token that can see it. Useful when the clarification is about the entity itself, not one agent's view of it.
Approvals
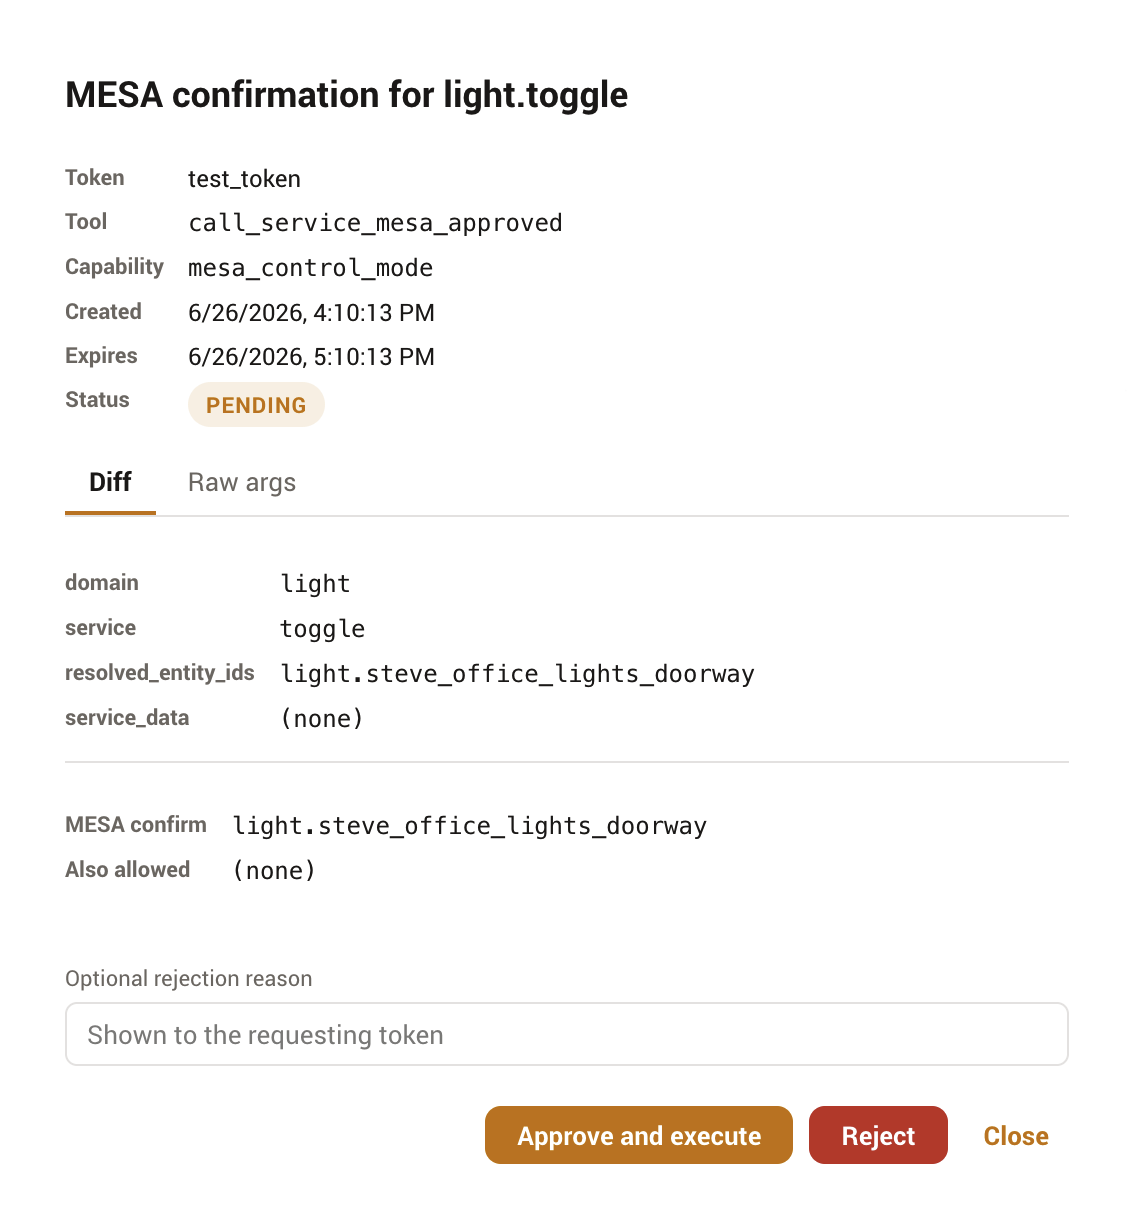
When a capability or a MESA entity is set to confirm, the held action lands in the Approvals queue. The tab badge shows the pending count, and a notification can deep-link straight to a specific approval. Opening one starts in Summary, a plain-language view of what is proposed and what it will do. Its connected command box offers Details, Reject, and Approve and execute. Reject first opens an optional reason field, removes the approval action, and leaves Cancel and Reject, so an accidental click does not resolve the request or leave two competing decisions on screen.
Details contains the existing technical title, token, tool, capability, timestamps, redacted Diff or Preview, raw arguments, and result. The Summary | Details control in the Approvals toolbar changes the titles in both Pending and History and chooses the next modal's default for this browser. Switching inside an open approval is temporary and does not change that preference. Summary is the safe fallback when browser storage is unavailable or contains an old value.
With an approval open, press Up Arrow for the previous visible item or Down Arrow for the next. Navigation follows the current list and History filters. At the first or last item, the key does nothing and the page behind the modal stays still. Arrow keys retain their normal editing behavior while focus is in a reason field or code editor.
Batch approvals, recovery, and previews
When more than one approval is waiting, select several rows or use Select all. Phoenix validates, runs, and audits each action separately. A batch stops at the first failure and leaves the remaining approvals untouched.
Approving records the decision to disk before the action runs. If that write fails the approval is refused outright and nothing is run, so it stays in the queue and you can try again once the problem is fixed. If Home Assistant stops while an approved action is already running, that approval is resolved as failed on the next start, with the reason Interrupted; may have applied. Whether it took effect is genuinely unknown, so it is not offered for approval again: approving it a second time could repeat a service call or a configuration write. Check the result yourself, and have the agent request it again if it did not land.
An upgrade cancels pending media-player volume approvals when their stored action format is no longer compatible. History identifies these as Cancelled after upgrade because the approval format is incompatible. Submit the volume request again so the complete current action can be reviewed.
Opening an approval from a notification shows that one approval on its own. When others are waiting, it says how many and offers Review all, which takes you to the queue where the tick boxes are. It does not offer to approve the rest from there, since you have not seen them yet.
The pending queue and History both use the same plain-language title as Summary, so YAML paths and dashboard coordinates stay in Details. Automations, scripts, scenes, and helpers use their saved names rather than showing only storage IDs. Older deletion records that did not save a friendly name say only the selected script, helper, scene, or automation instead of presenting an internal storage slug as a name. Device removal likewise uses the saved device and integration names; opaque registry and config-entry IDs remain in Details. History follows that proposal with the decision and its time, then the outcome. It distinguishes a completed action from one that was rejected, expired, cancelled, failed during execution, or was interrupted and may already have applied. Known executor errors have specific localized wording. An unknown diagnostic uses a localized Summary fallback instead of leaking technical English; its complete original result remains unchanged in Details.
The same approval appears here, in Agent Chat, and as a Home Assistant notification. Acting on it in one takes the buttons away in the other two immediately. While it runs it reads Being processed and offers nothing, and becomes actionable again if the action fails.
A dashboard layout change also offers a Diff | Preview switch in the diff's toolbar, rendering the proposed cards with live entity states (Home Assistant's own card renderer, so it looks exactly as it would on the dashboard, in your active theme) instead of just the raw config; the cards are display-only, so nothing you click in a preview can actuate a device.
An Energy dashboard change offers the same Diff | Preview switch, but it renders the Energy configuration itself: your sources and individual devices as a list, with added rows marked, removed rows marked, and a change shown as the old value directly above the new one. Energy has no card layout to draw, and Home Assistant's own energy cards read the saved preferences rather than the pending ones, so a card here would show your current dashboard instead of the change you are approving. Rows pair by statistic, so renaming a device reads as one substitution rather than an unrelated removal and addition.
Every before/after diff, on this tab and on Changes, also has a code editor button in the same toolbar. It hands both panes to Home Assistant's own editor, the one you already see in the ESPHome add-on, with syntax colours and line numbers, which makes a long device YAML far easier to read than a plain monospace block. The trade is stated in the toolbar when you switch: the code view cannot tint changed lines, so use the line diff when the question is what changed and the code view when the question is what the file says. The choice is remembered separately from the side-by-side and stacked setting.
If a proposed card fails to render (Home Assistant's "Configuration error" card), a Reject with error message button appears next to Approve/Reject that rejects with that error as the reason in one click, so the agent knows exactly what to fix. Rejection reasons are relayed to the agent and shown on the Agent Chat approval card, not just a bare "rejected". A reason typed here but not submitted is kept with that approval, so rejecting from the Agent Chat card (which has no reason box of its own) still sends it.
The panel subscribes to Home Assistant's event bus, so a new or resolved approval refreshes the queue immediately; the pending-count badge and the queue also poll every few seconds as a backstop in case an event is missed.
MESA
The MESA tab is where you author the per-entity safety profiles. It lists profiles by control mode and lets you edit profiles at the entity, device, area, integration, domain, and deployment-default levels, with canonical-tag autocomplete and a validation view for issues and orphans. A Suggested profiles section scans for under-protected entities, risky devices with no coverage, and automations whose actions reach them, and offers each profile as a one-click Apply, a prefilled Review, or a persistent Dismiss. The concept, the modes, and the editor's guardrails are covered on the MESA page.
Audit Logs
The Audit Logs tab is a filterable view of the request log: request ID, time, token, method, resource, outcome, and source. Source shows an IP address for network requests and a friendly surface name for requests made inside Phoenix MCP: Agent Chat, Assist Tool Provider, Voice Agent, or AI Task. Filter by token, outcome, or source to trace what an agent did. With an entry open, use Up Arrow and Down Arrow to scan the previous and next items in the current sorted list. The log's retention and storage are described in Operations.
Changes
The Changes tab is the configuration history for everything an agent builds. It opens on a feed of recent create, edit, and delete actions across automations, scripts, scenes, helpers, blueprints, dashboards, entity-registry edits, ESPHome device YAML, the raw configuration.yaml, and scoped file writes, and refreshes live as new changes land. Rows carry a one-line description of what actually changed where the resource name alone would not say: a dashboard card operation shows the card and its position ("added custom:apexcharts-card (view 0, section 6)"), a whole-layout or raw file write shows the card-count or size movement, a one-key configuration.yaml edit names the key, and an entity edit lists the changed fields.
Selecting a row opens that version's before/after diff directly, rendered as YAML for structured resources or as a line-highlighted text diff for raw configuration.yaml and file writes, with the resource's other versions in a timeline beside it so you can step through its history.
Each pane has its own Restore this configuration button, so you re-apply the Before (to undo a bad edit) or the After (to re-apply the change) explicitly. A button is hidden when restoring it would do nothing: an empty pane, like the Before of a freshly created resource, or the After of the resource's latest version, which is already its current config. A raw snapshot too large to have been stored shows a notice and cannot be restored.
Restore edits the resource if it still exists, or recreates it if it was deleted, and is itself recorded as a rollback you can undo in turn. Automations, scripts, scenes, and blueprints come back under their original id, so re-restoring the same delete is idempotent; a recreated helper gets a fresh id, because Home Assistant's storage collection assigns it. A few snapshots refuse to restore rather than restore incorrectly: a config whose snapshot contains YAML tags such as !secret, and a deleted entity-registry entry, which belongs to its integration and cannot be recreated; the admin API reference lists these. Storage and retention are described in Operations.
A dashboard version also offers the same Preview toggle as the Approvals tab, with a Before/After switch so you can see what the layout looked like on either side of the change, not just the config difference; unlike the Approvals card (which previews only the proposed After layout), a version records both sides, so you can preview the Before as well whenever the version has one. A side with no snapshot is disabled, the same rule as the Restore buttons: a resource's first-ever layout has no Before, and a deletion has no After. Restore stays a diff-view action.
Settings
The Settings tab holds the global, deployment-wide options: the kill switch, logging controls, the rate-limit notification, the MESA mode, the audit buffer size, and the experimental toggles (in-context MESA profile buttons, and token settings presets). These are detailed in Operations. It also holds the Agent Chat card, where you configure any of the 20 supported provider types, set the chat memory and steps-before-check-in limits, and choose Conversation style, Detail, and optional Home-focused behavior.
The Settings tab also connects Phoenix MCP to Home Assistant's AI features:
- Voice Agent: runs Phoenix MCP's model as a conversation agent with its own style, detail, and Home-focused settings.
- Assist Tool Provider: gives a bound token's tools to a model supplied by another integration.
- AI Task: registers an AI Task entity for generating automation data.
Each feature uses a token you choose and keeps the same scope, approvals, and audit trail.
Conversation style and Detail control presentation only. Home-focused is labelled Focus preference, not a security control. These server-side settings take effect on the next model turn without clearing existing Agent Chat history; an already-running turn finishes with its starting settings. They do not affect external MCP clients or the Assist Tool Provider.
Language and theme
The Integration information card carries two display preferences. Both are per-browser rather than deployment-wide, so each admin sets their own and neither is written to Phoenix MCP's storage or shared between users.
Language chooses the panel language. Phoenix MCP ships English, Spanish, French, German, Dutch, Polish, Russian, Simplified Chinese (zh-Hans), Traditional Chinese (zh-Hant), Korean, and Japanese. Auto is the default and follows the language set on your Home Assistant user profile, so in most cases there is nothing to choose; pick a specific language only when you want the panel to differ from the rest of Home Assistant. Every option is named in its own script, so you can find yours whatever the panel happens to be showing. The choice applies to the Agent Chat window and the in-context MESA buttons as well, and takes effect immediately without a reload.
A few things stay in English on purpose rather than being missed. The six per-token sensors keep English names, because Home Assistant builds their entity_id from the display name the first time they are registered and a translated name would give a fresh install different entity ids from every other install. Agent-facing text is also never translated: tool descriptions, the skill document, and the errors an agent reads stay English so a model's behaviour does not change with your display language. The name Phoenix MCP itself is a brand mark and stays in Latin script in every language, which is also how Home Assistant treats its own name; several places name this integration inside Home Assistant's own interface, where it cannot be localized at all.
Theme is light, dark, or follow-the-system, and behaves the same way.
Agent Chat
Open Agent Chat from the panel header to use a scoped agent without an external client. With Show throughout Home Assistant enabled, press Shift+A to show or hide it from any Home Assistant page. See the Agent Chat guide for provider setup, pop-out mode, memory, and privacy.