Connect an AI client
Connect an MCP client that accepts a custom bearer header. Use the Phoenix endpoint and one scoped access key.
Choose the shortest setup for you
- First access key: follow the guided quick start to grant one device and test it.
- No external client: use Agent Chat inside Home Assistant with the same scope and approvals.
Protect the connection credentials
Use an HTTPS Home Assistant URL for remote clients or any network you do not fully trust. Plain HTTP carries bearer credentials without transport encryption. The addresses and phx_... values below are placeholders: enter your own URL and use a separate, narrowly scoped access key for each client.
Prefer your client's secret store or environment-variable interpolation when supported. Pasting a raw access key into a terminal command can retain it in shell history; reading it interactively into a variable avoids typing the value into the command. A client may still save the expanded header in its configuration. Keep such files private, restrict file access, and exclude them from version control. Do not put real access keys in shared project configuration, screenshots or support logs. Rotate an access key if its full value was disclosed.
Advanced: Claude web, Desktop and mobile
Claude Code works directly. Claude's hosted custom connector can reach Phoenix in two ways: directly with an access key, when your organization has Anthropic's limited Request headers beta, or through Home Assistant's MCP Server integration on Home Assistant 2026.10 or later. Neither is in the panel's normal client chooser.
| Claude client | Status | What to do |
|---|---|---|
| Claude Code | Supported | Use the generated claude mcp add command. It sends the access key in the Authorization header. |
| Claude web, Desktop remote connectors, mobile, and Cowork, with an access key | Limited beta | An organization owner adds the connector with a required Authorization request header. Recommended where available: Claude holds one scoped Phoenix access key. |
| The same clients, through Home Assistant's MCP Server | Alternative | Home Assistant 2026.10 or later. Claude signs in with a Home Assistant administrator account and uses the access key bound to Assist. See below. |
- Claude now uses one hosted remote-connector system across the web app, Desktop, mobile apps, and Cowork. Connections originate from Anthropic's cloud, so the MCP endpoint must be public.
- Personal plans add connectors under Customize > Connectors. Team and Enterprise owners add them for the organization before members connect.
- Users can control connector access and individual tool permissions.
- Request header authentication is a limited organization beta. Choose Authentication: No sign-in first, then pick
authorizationfrom the header-name list and enter the full valueBearer phx_your_access_key_here. The list offersauthorizationonly with No sign-in; entering it as a custom header name needs Anthropic's approval. Dialog layouts vary; some show authentication fields under Advanced. - The connector URL is your public Home Assistant address followed by
/api/phoenix-mcp. Any proxy or tunnel in front of Home Assistant must pass streamed responses through; a Cloudflare quick tunnel, for example, does not. - The access key is shared by everyone in the organization who uses the connector. Create a dedicated least-privilege Phoenix access key for this connector.
- Do not put the access key in the connector URL. Claude sends request-header values exactly as entered and does not add the
Bearerprefix for you.
Through Home Assistant's MCP Server
Without the Request headers beta, Claude can sign in to Home Assistant itself and reach Phoenix's Assist tools through Home Assistant's own MCP Server integration. This needs Home Assistant 2026.10 or later, reachable over public HTTPS. Behind a reverse proxy or tunnel, open Settings > System > Network, turn on Trust X-Forwarded-For, add the proxy's network under Trusted proxies, and set the external URL to the public address.
- In the Phoenix MCP panel, open Settings > Assist Tool Provider and bind a least-privilege access key. Claude uses this key.
- In Home Assistant, add the Model Context Protocol Server integration. In its options, turn off Expose all LLM APIs, set Control Home Assistant to only Phoenix MCP (scoped), and keep Require an administrator account on.
- In Claude, add a custom connector with the URL
https://your-home-assistant/api/mcp/phoenix_mcp. Keep the sign-in authentication, choose Claude's published identity for the OAuth client, and leave any client ID and secret empty. - Connect and sign in with a Home Assistant administrator account.
- Claude holds a Home Assistant administrator credential. Selecting the Phoenix API limits the tools Claude is offered, not what the credential can do in Home Assistant's own API.
- The Phoenix kill switch and revoking the bound access key stop Phoenix's tools but do not revoke Claude's Home Assistant sign-in. Disconnecting the connector in Claude does not revoke it either: delete its refresh tokens in your Home Assistant profile under Security, where each sign-in appears separately.
- Everyone using the connector shares the Assist-bound access key, and changing that binding also changes what Assist voice uses. Phoenix's per-key request limits do not apply on this route.
- Home Assistant publishes each tool's fields and required list but drops rules stated for the tool as a whole, such as "give at least one of these". Phoenix still checks every call against its full rules and refuses one that breaks them. Confirm-gated actions return
queued_for_approvalfor an administrator to review. - Home Assistant describes the whole instance, not the MCP URL, as the protected resource. Claude accepted this in testing, but it differs from Claude's published requirement and may change.
See Anthropic's remote connector setup and connector authentication documentation, and Home Assistant's MCP Server integration.
Connect and verify
Create an access key
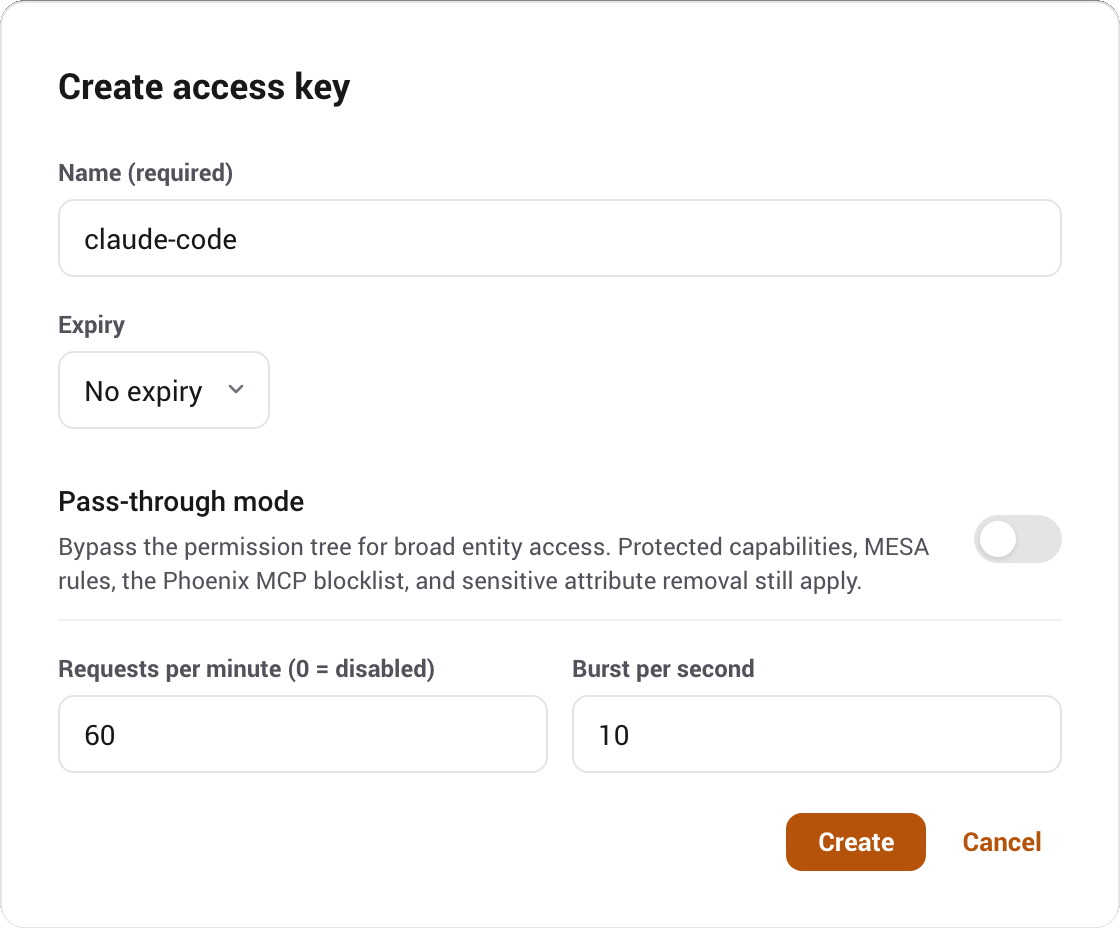
In the Phoenix MCP panel, open the Access keys tab and click Create access key. Give it a name like claude-code and create it.
Copy it now
The access key value is shown exactly once and cannot be retrieved later. Copy it before you close the dialog.
Set its permissions
A new access key has no access by default. Use the permission tree to grant the domains, devices, and entities you want the client to work with, and enable any capability flags it needs.
Add the MCP server
Run this in your terminal, substituting your Home Assistant address and the access key you copied. Phoenix MCP derives a distinct server name from each access key's name (lowercase, underscores changed to hyphens, with a phx- prefix), so an access key named claude-code registers as phx-claude-code.
claude mcp add --transport http phx-claude-code \
  http://your-ha-address:8123/api/phoenix-mcp \
  --header "Authorization: Bearer phx_your_access_key_here"
If you reach Home Assistant through Nabu Casa or a custom domain, use that URL instead.
claude mcp add --transport http phx-claude-code \
  https://your-instance.ui.nabu.casa/api/phoenix-mcp \
  --header "Authorization: Bearer phx_your_access_key_here"
This example uses Claude Code's CLI and registers the server for your current project. Add --scope user to use it across projects. The panel's Connect step generates commands or configs for the clients below. Each client must support Streamable HTTP at /api/phoenix-mcp and an Authorization: Bearer header carrying your access key.
Verify the connection
Start a new Claude Code session and run /mcp. The phx-<access-key-name> server should show as connected. Ask the client to list your entities or check a light to confirm.
Adding more access keys as separate profiles
Because each access key gets its own server name, you can keep several configured in one client at once, one entry per access key, all pointing at the same Phoenix MCP URL with a different access key each. To add another, create a second access key in the panel, and on the screen shown after it is created choose Connect an external agent and run the command it shows, the same way you did for the first. Switch between them by toggling which entry is enabled in the client (in Claude Code, /mcp) instead of clearing and retyping credentials. Enable only one Phoenix MCP server at a time: enabling several gives your agent duplicate Home Assistant toolsets with different permissions.
Save each access key's command when you first see it
Phoenix MCP stores only a hash of an access key's value, so the panel cannot show an access key's config again after you close its creation (or rotation) dialog. If you lose it, rotate the access key to get a fresh value and command.
The agent skill optional
On connection, Phoenix MCP sends a short, access-key-aware primer that links to the full guide. Optional skill installation makes the guide available locally. Native skill clients discover its name and description first, then load the full guidance when the skill is activated.
Client-specific setup
The examples use an access key named home. Replace the address and access key before running them. The panel generates these values for your actual access key. Terminal commands below use macOS/Linux shell syntax.
Gemini CLI
gemini mcp add phx-home http://your-ha-address:8123/api/phoenix-mcp \
  --transport http --header 'Authorization: Bearer phx_your_access_key_here'
Run from your project directory, then check with gemini mcp list. Add --scope user to make it available across projects. See Gemini's MCP instructions.
Codex
export PHOENIX_ACCESS_KEY_HOME=phx_your_access_key_here
codex mcp add phx-home --url http://your-ha-address:8123/api/phoenix-mcp \
  --bearer-token-env-var PHOENIX_ACCESS_KEY_HOME
Check with codex mcp list, then start Codex from that shell. For future terminals, put the export in your shell profile. In PowerShell, set $env:PHOENIX_ACCESS_KEY_HOME="phx_your_access_key_here" for the current session; setx only affects newly started processes.
Alternatively, add this table to ~/.codex/config.toml or a project's .codex/config.toml, with the same environment variable set before starting Codex:
[mcp_servers.phx-home]
url = "http://your-ha-address:8123/api/phoenix-mcp"
bearer_token_env_var = "PHOENIX_ACCESS_KEY_HOME"
Local Codex clients share MCP configuration on the same host. An app launched separately may not inherit shell variables. In that case, use the app's MCP server settings: add a Streamable HTTP server, leave its bearer token environment field empty, and add Authorization with the value Bearer phx_your_access_key_here. Save and reconnect. Choose one setup method; see the official MCP documentation.
Cursor
Add this entry to ~/.cursor/mcp.json for all projects or .cursor/mcp.json for one project, preserving any existing servers. Enable it in Cursor's MCP settings.
{
  "mcpServers": {
    "phx-home": {
      "url": "http://your-ha-address:8123/api/phoenix-mcp",
      "headers": { "Authorization": "Bearer phx_your_access_key_here" }
    }
  }
}
See Cursor's MCP instructions.
DeepSeek Harness experimental
DeepSeek Harness offers a desktop app for macOS and Windows, as well as a CLI. Configure your model account in Harness, separately from Phoenix's Agent Chat provider accounts. Phoenix support is experimental while Harness is in preview.
Desktop app
- Install and open Harness once, then fully quit the application. Closing its window can leave it running in the background.
- Open
~/.dsh/profiles/desktop/cordis.patch.ymlin a text editor. Here~means your home directory; on Windows the path is%USERPROFILE%\.dsh\profiles\desktop\cordis.patch.yml. If you set a customDSH_HOME, use$DSH_HOME/profiles/desktop/cordis.patch.yml. - If the file does not exist, create it with the YAML below. If it already exists, append this entire
- insert:block as another top-level list item, preserving existing entries. Replace the address and access key; keep the file private. - Save the file and reopen Harness. Ask it to list your Home Assistant lights and confirm it calls Phoenix tools.
Harness uses the access key's lowercase name with underscores replaced by hyphens, without the phx- prefix, so a 32-character access key name fits its server-name limit.
- insert:
    - id: mcp-phx-home
      name: '@deepseek-ai/dsh-mcp-client'
      config:
        serverName: "home"
        transport: streamable-http
        url: "http://your-ha-address:8123/api/phoenix-mcp"
        headers:
          Authorization: "Bearer phx_your_access_key_here"
CLI alternative
For a CLI launch, save the same YAML as a new phoenix.cordis.yml file in your working directory. Install Node.js, then run from that directory. This launches the web interface; it does not start the desktop app.
npx @deepseek-ai/dsh web --patch "$PWD/phoenix.cordis.yml"For persistent CLI setup, use the matching profile's cordis.patch.yml. The shared ~/.dsh/cordis.patch.yml applies to every profile, including Desktop; use it only if you want the same connection in every profile. See the desktop reference, MCP client reference, and profile patch instructions.
Other clients
The panel's Other MCP client tab supplies an example for clients accepting mcpServers JSON. Client configuration formats are not standardized by MCP. Follow your client's guide and preserve the Phoenix URL and bearer header.
Install the optional agent skill
The agent skill
The skill is a usage guide for the connected AI. You get it two ways, and you do not have to choose; the primer always ships, the installed skill is extra.
Automatic primer
Phoenix MCP sends a short, access-key-aware primer in the legacy initialize response and in modern server/discover. It names which of this access key's capabilities are approval-gated and links to the full guide. Legacy 2025-03-26 clients complete initialization and keep their session ID; modern 2026-07-28 clients carry protocol metadata on each request and use no session. No install, nothing to maintain.
Installed skill
The full guide is served, unauthenticated, at /api/phoenix-mcp/skill. The Connect step in the panel shows native skill installation for Claude Code, Codex, Gemini CLI, and DeepSeek Harness, and a project rule for Cursor.
mkdir -p ~/.claude/skills/phoenix && \
  curl -fsSL http://your-ha-address:8123/api/phoenix-mcp/skill \
  -o ~/.claude/skills/phoenix/SKILL.md
For another native skill client, use its destination from this table with the same mkdir -p and curl -fsSL pattern. The guide is generic and contains no access key or entity data.
| Client | User skill file | After installation |
|---|---|---|
| Claude Code | ~/.claude/skills/phoenix/SKILL.md | Check the available skills in a new session. |
| Codex | ~/.agents/skills/phoenix/SKILL.md | Check /skills; restart if missing. |
| Gemini CLI | ~/.gemini/skills/phoenix/SKILL.md | Run /skills reload. |
| DeepSeek Harness | ~/.dsh/skills/phoenix/SKILL.md | With a custom DSH_HOME, use its skills directory instead. |
For Cursor, download the guide to .cursor/phoenix.md and add .cursor/rules/phoenix.mdc with the metadata below. The panel supplies the complete command. A plain .md file in .cursor/rules is ignored.
---
description: Use when inspecting, controlling, or configuring Home Assistant through Phoenix MCP
alwaysApply: false
---
Before using Phoenix MCP tools, read @.cursor/phoenix.md for scoped permissions, approvals, and MESA guidance.
See Codex skills, Gemini skills, and Cursor rules. For other clients, reference the downloaded guide from their supported project instructions.
Skill and reconnect rules
- The skill is advisory: permissions, approvals, and MESA enforce access even if the client ignores its guidance.
- Reconnect after the visible tool set changes: reconnect after changing a capability between
denyandallow/confirm, changing write scope, or changingannounce_all_tools. In Claude Code, open/mcpand select Reconnect. - No reconnect for approval mode alone: changing
allowtoconfirm, or back, takes effect on the next call. Some clients may still cache metadata.
Connect Home Assistant Assist or voice
Use with Home Assistant Assist and voice
Besides external MCP clients and Agent Chat, you can put Phoenix MCP behind Home Assistant's own Assist, so a voice or chat conversation runs through one access key's scope, MESA safety, approvals, and audit instead of the unscoped default assistant. There are two ways to do this; pick whichever fits. For generating data inside automations rather than driving a conversation, see AI Task below.
Assist and Voice also check the requesting Home Assistant user. Active administrators can use the access key's privileged tools. Other users and unidentified satellites can use scoped household controls and discovery, with the access key's existing Confirm and MESA gates. Identified users retain their Home Assistant entity permissions. Logs, configuration, templates, diagnostics and authoring require administrator identity, even with a pass-through access key. The Voice Assistant preset denies System log read by default. Removing or changing a user invalidates an active request; approving a queued household action still checks its original requester.
Option A: bring your own model
Phoenix MCP registers a control API named Phoenix MCP (scoped) that hands its scoped tools to a model an LLM conversation integration already supplies (OpenAI, Google, Anthropic, Ollama, and so on). Requires Home Assistant 2026.7 or later, which is also the integration's own minimum.
- In the Phoenix MCP panel, open Settings > Assist Tool Provider and choose the Bound access key. Only one access key can be bound at a time; a least-privilege access key (for example the Voice Assistant persona) is recommended. Changing or clearing the binding applies to the next tool call: a conversation turn already running under the previous access key has its further tool calls refused rather than continuing with that key.
- In your LLM conversation integration (Settings > Devices & Services), set its Control Home Assistant option to Phoenix MCP (scoped), then select that agent in Settings > Voice assistants. This applies to LLM-backed conversation agents, not the default template Assist pipeline.
With Google Gemini, Home Assistant cannot show some tool fields in their full form, such as a field that takes one entity or a list. Phoenix shows Gemini a simpler form of those tools and still checks every call against the full rules. Free-form settings such as service data or an automation config are sent as JSON text, which Phoenix turns back into the original object. Two tools whose value can be any JSON type, patch_dashboard and set_zigbee_device_property, are not offered to Gemini; use set_dashboard_config or the dashboard card tools instead.
From Home Assistant 2026.10, a refused or failed Phoenix tool call reaches the model marked as an error rather than as a normal answer, and a call queued for approval is not marked as one. Each tool also carries Phoenix's read-only and destructive hints, which Home Assistant's MCP Server integration passes on to its clients. Earlier releases receive the same answers without these markers.
Option B: let Phoenix MCP be the agent (no external software)
If you would rather not install a separate LLM app, Phoenix MCP can register itself as a conversation agent and run its own model, using an existing Agent Chat provider account.
- In Settings > Voice Agent (the Phoenix MCP panel), enable it and pick an access key, a provider account, and a model.
- Choose its Conversation style and Detail. Optionally enable Home-focused, a focus preference rather than a security control. The next request uses any changed setting immediately.
- Let Phoenix MCP set it up for you: on the first enable it offers to create an Assist assistant pointed at Phoenix MCP (and, if you leave the option on, make it your preferred assistant). Or use Set up Phoenix MCP assistant in that card any time.
- Prefer to do it by hand? In Settings > Voice assistants, set your assistant's conversation agent to Phoenix MCP.
Optional command routing can handle supported Voice commands locally or through a separate decision account before using your conversational provider. It defaults to Off. Routing follows the Assist conversation language and installed Assist language catalog; supported sentences and model accuracy vary by language. Keep Home Assistant's Prefer handling commands locally disabled so commands reach Phoenix and its permission checks.
When the model marks a Home-focused voice refusal using Phoenix's private protocol, Phoenix replaces the model prose with a localized refusal. There is no spoken override: Home focus stays on until you turn it off in settings. The rejected utterance is not retained. A model that omits the private marker is handled normally without Phoenix guessing from its prose. Even at Detailed, Voice keeps replies suitable for speaking aloud.
Before you use voice
- In Settings > Voice assistants, turn off Prefer handling commands locally. Otherwise Home Assistant will not route requests to Phoenix MCP.
- Make the Phoenix MCP assistant your preferred assistant when you want satellites to use it.
- Voice has no inline Approve button. Confirm-gated actions wait for approval in the Phoenix MCP panel.
Generate automation data with AI Task
Generate data in automations with AI Task
Home Assistant's AI Task feature lets an automation, script, or dashboard ask an AI model to produce text or structured data on demand, through the ai_task.generate_data action. Phoenix MCP can be that model: it registers an Phoenix MCP AI Task entity that runs Phoenix MCP's own model on an access key's scope, so a task reads only what the access key can see and every tool call it makes is gated, MESA-checked, and audited like any other. Available on every supported Home Assistant version. Like Agent Chat, the model comes from a provider account, so each task's prompt and the tool results the model sees are sent to that provider; use a local Ollama account to keep tasks fully local.
AI Task always uses household-only authority, including when an administrator starts it. It cannot use privileged tools such as logs, configuration or authoring. Use it for scoped home state and control; use administrator Agent Chat for maintenance tasks. See the security boundaries.
- In Settings > AI Task (the Phoenix MCP panel), enable it and pick an access key, an Agent Chat provider account, and a model. The Phoenix MCP AI Task entity appears once all four are set, and disappears again if you disable it or clear one of them.
- Choose a Conversation style and Detail for free-text results. Structured tasks omit both preferences and follow their output schema exactly.
- Optionally click Make default in the AI Task setup section to make Phoenix MCP your default entity for Data generation tasks, so an
ai_task.generate_dataaction that does not name an entity runs through Phoenix MCP. Home Assistant keeps a single default, so the panel confirms before replacing an existing one. - Point an AI Task action at the Phoenix MCP AI Task entity by
entity_id, or leave the entity unset to use your default.
Here is an example script which asks Phoenix MCP to summarize the home and shows the answer as a notification. Because the task runs Phoenix MCP's scoped tool loop, the model looks up the lights itself, within the access key's scope, before it writes the sentence:
sequence:
  - action: ai_task.generate_data
    data:
      task_name: home_summary
      entity_id: ai_task.phoenix_mcp_ai_task
      instructions: >-
        Check how many lights are on and reply with one short,
        friendly sentence naming a few of them.
    response_variable: result
  - action: persistent_notification.create
    data:
      title: Home summary
      message: "{{ result.data }}"
Pass a structure to the action and Phoenix MCP returns a validated JSON object instead of prose (for example { "count": 3, "names": […] }), which an automation can branch on directly. A reply the structure rejects, such as one with a missing or unrequested field, a value of the wrong type or a value outside its limits, fails the action instead of reaching the automation; any tool calls the task made before that have already run. Conversation style and Detail are omitted for this structured path so presentation preferences cannot compete with the schema.
A confirm-gated task queues for approval
AI Task is not interactive, so if the model calls a Confirm-gated tool the call is reported as queued; you will need to approve it later in the Phoenix MCP panel. AI Task reuses an Agent Chat provider account for its model. Revoking or expiring the access key it uses, or deleting that provider account, removes the Phoenix MCP AI Task entity and clears it as your default.